
Creating the perfect cup of coffee at home is both fulfilling and rewarding. One crucial skill in making a rich, velvety latte or cappuccino is learning how to steam milk with the Breville Barista Express. Initially, my attempts resulted in milk that was frothy but filled with large bubbles. With continued practice and focus on technique, I soon noticed vast improvement. If you're having trouble with your steam wand or simply want to improve your milk steaming technique, this guide will show you how to achieve cafe-quality milk foam. Uncover the brewing precision of the Breville Dual Boiler BES920XL review
Understanding Your Breville Barista Express Steam Wand
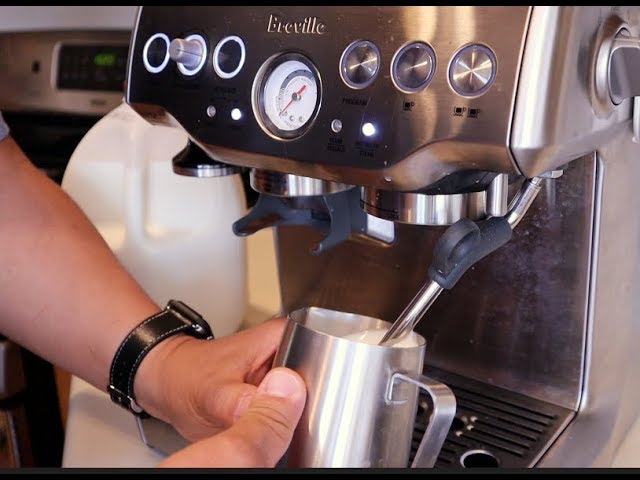
The Breville Barista Express is a highly versatile espresso machine, equipped with a 360-degree swivel steam wand. Before you start, ensure your machine has fully heated. This is essential for the best results. Wait for the indicator lights to signal readiness. Using a partially heated steam wand can result in subpar foam, so be patient and wait for the machine to be properly heated. Learn how this model blends convenience with innovation in the Breville Barista Touch Impress review
Once heated, your steam wand will be ready to begin. The steam nozzle on the Breville Barista Express allows you to produce both microfoam (for lattes) and larger, airier foam (for cappuccinos). Understanding how to manipulate this steam wand is key to getting the texture you want for your drinks. Compare these top models to find your perfect match in the Breville Barista Express Impress vs Pro review
Preparing Your Milk for Steaming
The type of milk you choose plays a significant role in the quality of your foam. Whole milk gives you a creamy and smooth texture, while skim milk creates a lighter, airier froth. Plant-based options such as almond, oat, or soy milk can also produce great results, but you might need to adjust your technique depending on the fat and protein content. See what makes these machines stand out in the Breville Barista Pro vs Express review
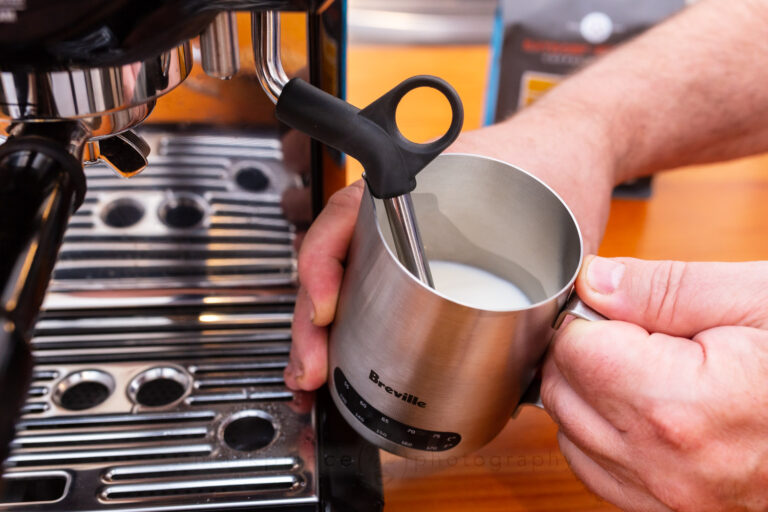
For optimal steaming, use a stainless steel milk jug. Stainless steel is ideal because it allows for better heat conduction and is easy to monitor milk temperature. Additionally, a steel jug makes it easier to see the texture of the milk as it develops. A 12-ounce jug is ideal for a single serving, filled one-third of the way with cold milk, leaving enough room for the milk to expand without overheating. Explore the key differences between these premium machines in the Breville Oracle vs Oracle Touch review
Step-by-Step Process for Steaming Milk
Now, let's get to the heart of the matter—the steaming process. Follow these steps carefully to achieve perfectly textured milk for your coffee.
1. Purge the Steam Wand
Start by turning on the steam wand briefly to purge any condensation inside the wand. This step is essential for ensuring dry steam, which is necessary for smooth, consistent microfoam. Skipping this step can result in uneven milk texture and large bubbles. To purge, turn the steam knob for just a second to let any excess water escape before you start steaming the milk.
2. Position the Steam Wand Correctly
Place the steam wand just below the surface of the milk, near the jug’s spout. It’s important to tilt the jug slightly to help create a whirlpool effect while steaming. This spinning motion will help evenly distribute the air throughout the milk, which is essential for creating a smooth, velvety texture.
Avoid submerging the wand too deeply at first, as this will make it harder to create the right texture. The goal is to position the wand just below the surface, allowing air to be incorporated effectively.
3. Add Air (Stretch the Milk)
Turn the steam knob to full power and listen for a soft hissing sound. This noise means that air is being introduced into the milk. Keep the wand near the surface for the first 3 to 5 seconds to stretch the milk, allowing air to enter and create a creamy texture. It’s important to monitor this process carefully—if you hear a loud or harsh hissing sound, it means you’re adding too much air, which will result in large, undesirable bubbles.
The key here is balance—too little air, and the milk won’t have the right texture. Too much, and the foam will be coarse with large bubbles. Aim for a gentle hiss that signals just the right amount of air being incorporated into the milk.
4. Texture the Milk
Once the milk has stretched and air has been incorporated, it’s time to fully heat and texture the milk. To do this, slightly raise the jug to submerge the steam wand more deeply into the milk. This will stop adding air and allow the steam to heat the milk while maintaining the whirlpool effect. The whirlpool motion helps break down any large bubbles, resulting in a smooth, silky finish.
As the milk heats, you should notice it becoming glossy and shiny, resembling wet paint. This glossy texture is the hallmark of well-textured milk—perfect for creating smooth lattes or cappuccinos.
5. Monitor the Temperature
To check the temperature, touch the outside of the jug. When it becomes too hot to hold comfortably for more than a second, it’s time to stop steaming, which typically occurs around 150°F (65°C). You can also use a thermometer for greater precision. Avoid overheating the milk, as it will lose its natural sweetness and flavor.
Steaming milk beyond 170°F (77°C) can cause it to scald, giving the milk a burnt taste and stripping away its sweetness. Always stop steaming when the jug is too hot to hold comfortably.
6. Turn Off the Steam Wand
Always turn off the steam wand before removing it from the milk to avoid splashing. Once you’ve finished steaming, carefully remove the wand and set the jug aside. Be cautious with the steam wand, as it will be very hot.
Finishing Touches for Perfect Milk Texture
After steaming your milk, there are a few final steps that will help you achieve that smooth, glossy texture.
Tap and Swirl the Milk
Once you’re done steaming, gently tap the jug on the counter and swirl it in small circles. This helps remove any remaining large bubbles and brings the milk to a smooth, even texture. The swirling also helps integrate the foam with the liquid milk, ensuring a silky consistency.
Clean the Steam Wand Right Away
After every use, immediately wipe the steam wand with a damp cloth and purge it again to prevent milk residue from clogging the wand. Neglecting this step can lead to hygiene issues and decreased performance over time.
Pour Your Milk
Finally, it’s time to pour your milk into your espresso. When pouring, tilt the cup slightly, and pour the milk steadily into the center of the espresso. Start pouring from a higher point to mix the milk and espresso, then lower the jug as you pour to maintain control.
If you’re feeling creative, this is also where you can try your hand at latte art! With practice, you can create beautiful designs like hearts, tulips, or even intricate swirls. Latte art requires a steady hand, but once you get the hang of it, it’s incredibly satisfying to create your own designs.
Tips to Perfect Your Milk Steaming Skills
Like any skill, perfecting milk steaming takes time and practice. Here are a few additional tips to help improve your technique:
Practice Regularly
Don’t get discouraged if you don’t achieve perfect results right away. Steaming milk is all about experimentation and developing muscle memory. Keep practicing to refine your technique and get the texture just right.
Always Use Fresh Milk
Fresh milk has higher protein content, which is key for creating a thick and stable foam. Make sure your milk is fresh, and always check the expiration date before use.
Experiment with Different Milk Types
Each milk type froths in unique ways. Whole milk is ideal for creamy, stable foam, while plant-based milk such as oat milk works wonderfully for creating microfoam. Almond and soy milk also have their own unique characteristics, so don’t be afraid to experiment and find the milk that works best for you.
Mistakes to Avoid
When steaming milk, it’s easy to make a few common mistakes. Here’s a list of things to watch out for:
Over-Aeration
Introducing too much air can lead to large, coarse bubbles that ruin the texture of your foam. Aim for a gentle, controlled hiss and stop aerating once the milk has reached a smooth texture.
Overheating the Milk
Milk scalds at temperatures above 170°F (77°C), which can give your foam a burnt flavor and destroy its natural sweetness. Always stop steaming before the milk gets too hot.
Neglecting to Clean the Steam Wand
A dirty steam wand can clog up and affect the texture of your milk. Clean and purge the wand immediately after each use to ensure it continues to perform at its best.
Explore Latte Art
Once you’ve mastered the basics of steaming milk, you can take it a step further by learning latte art. Start with simple designs like hearts or tulips, and as you become more confident, try more complex patterns. Latte art adds a creative touch to your coffee, and with practice, you can impress friends and family with your skills.

Conclusion: Achieving Café-Quality Milk at Home
Mastering the technique of steaming milk with the Breville Barista Express has significantly enhanced my at-home coffee experience. With practice and a solid understanding of the process, you can easily achieve beautifully textured milk for your lattes, cappuccinos, and even for intricate latte art.
Whether you’re preparing your daily morning coffee or experimenting with new designs, crafting café-quality beverages at home is incredibly rewarding. So fire up your Breville, grab your milk jug, and embark on your coffee journey—perfectly steamed milk is just a few steps away!